Dutch Tool Chest…Drawer…Campaign Style Pulls…Done…

Well my apologies dear readers, I have been amiss here lately. The past couple of weeks have had me running ragged with my Dad and my day job. Pop had another short hospital stay right before he was to be discharged from rehab and was delayed a couple of days. Have since been moving him into assisted living. He’s been a great sport about all of the changes, but even good change is stressful at times. Since my last entry, tonight is the first I’ve had the energy to write.

About a week ago, I completed the other drawer pull.

20140325-215243.jpg And they turned out very well. I’m pleased.

20140325-215453.jpg

20140325-215523.jpg The only difference on the second pull was the amount of waste material I drilled out. I removed a lot more on this pull.

20140325-215856.jpg I just left a little material in the corners for the pull to attach to.

This project was fun and I learned a lot. Londonderry Brasses products are awesome. A chisel can never be too sharp. I need a centering punch for locating screws. Starrett makes a nice one. I really like doing this type of work.

I have two projects going on at the moment. One, a small kitchen table for a friend and two, a step stool for another friends toddler. Be safe and stay tuned, more coming soon.
-Charlie

Dutch Tool Chest…Drawer…Campaign Style Pulls…

Shortly after I finished my drawer, I had a crazy idea to install campaign style drawer pulls. Chris Schwarz recommended Londonderry Brasses and they did not disappoint. I ordered two of model CP-21.

20140316-232542.jpg The quality is fantastic and Nancy is very nice to work with. I photocopied the backside of each pull and cut and pasted each pic in place to serve as a guide for waste removal.

20140316-232938.jpg

20140316-233008.jpg I used a 1/2″ Forstner bit on my rinky dink bench top drill press to remove the majority of the waste.

20140316-233227.jpg This particular pull is 3/16″ deep and covers a lot of real estate. I need to go back and remove some additional material. I only need a 3/8″ square in each corner to support and anchor the pull, the rest can be removed. I finished the pocket for one pull and I’m very pleased with it.

20140316-233917.jpg I’m going to install steel screws first and then go back with brass. I’m afraid I’ll snap the brass ones since the wood is red oak. Hopefully I’ll get the second one done Mon night. Be safe.
-Charlie

Something New…Wood Sculpting I Guess…

20140310-230612.jpg Not really sure what to call this project, but my step daughter, Stephanie, wants a wooden asymmetrical wood block for a small plant stand. Here’s what I have so far.

This chunk of wood is about 6 x 6 x 4″. And it’s pecan that’s been dead for probably 3 years now, maybe longer. Same tree I made my mallet from. I think all of the decay and rotting gives it some character. I used a hatchet to get the rough shape split from a log and then my 3 bench planes to refine the faces. There’s one crack I want to try and fill with epoxy or glue and then I’ll cut a hole for the small pot and seal everything real good. Stay tuned and be safe.
-Charlie

Small Box for Kate…Part 8…Finishing…and some serious leveling…

Woodworking wise, last night and today were great. My better half has been out of town and I was able to do a lot of what I wanted to do.

I’ve been experimenting with different finishes to find one for Kate’s box and I’ve settled on boiled linseed oil. I bought some Thu evening. I have 3 coats on it now and I think I will call it quits. I may apply some lacquer for a top coat not sure. I am a complete green horn about finishes. So feel free to offer any and all comments, critiques, or suggestions.

20140308-232701.jpg

A couple of days ago, I noticed my bench top was sagging, right in my prime work area. So Fri night, I pulled the bench out, cleared it off, and went to town with my jointer. Recently, I put a small camber on this iron and last night I planed across the bench on both diagonals. A cambered plane iron is the neatest thing since sliced bread and my jointer made short work of the task. Big huge shavings were flying off of the bench with ease. I took my time and was done in 35 minutes. Now my bench is nice and flat.

20140308-233701.jpg

Because these cambered irons have made such a difference in my work, I decided to take another look at the first step stool I built. The panel glue up did not come out as well as I had hoped and the show sides were not level at all. But they are now. I secured the step stool to my saw bench with two holdfasts, sat down on the bench, and worked on each side. First with my fore plane, then my jointer, and finally my smoother. I was amazed at how quickly and efficiently I was able to get each side even across their faces. There’s still quite a bit of tear out because of the boards I chose, but the technique for preparation is sound. Sorry no close up pic. It’s a functional stool but nothing I want anyone to see.

While I was working on the old step stool, I realized that my saw bench was not level side to side and I needed more holes for hold fasts. Fore plane, jointer, level bench.

20140308-234945.jpg

Tomorrow I buy boards for a small kitchen table I’m making for a friend. I’m also working on n interesting pot holder for my step daughter Stephanie. Be safe.
-Charlie

Small box for Kate…Part 7…Lid…

I beveled the top of this lid so it wouldn’t look like a miniature crate. I scribed a line 1/4″ below the top on the edges and 1″ inward on the top. I then used a fore plane and smoother to complete the bevel.

20140303-222300.jpg

20140303-222336.jpg However, I planed in the wrong direction for one cross grain bevel and blew out a chunk of the far edge. A little Elmer’s and a blue clamp will fix it right up. I’m going to let the glue dry over night before I complete the top. But here’s a teaser.

20140303-222807.jpg Stay warm, dry, and safe.
-Charlie

Small box for Kate…Parts 5 & 6…

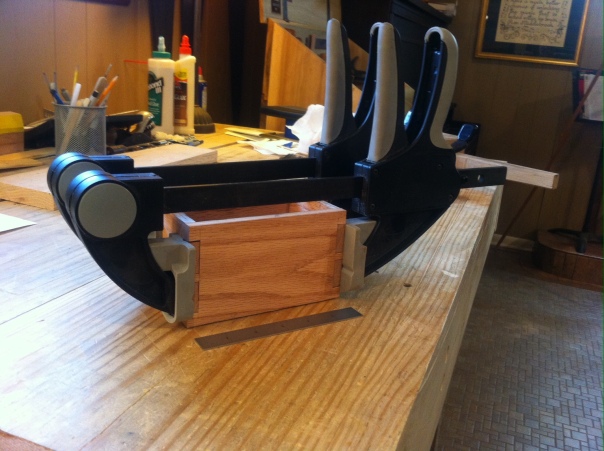
WOW! It’s been a busy a few days in my shop. I’ve gotten a lot done. I lengthened the groove in each of the long side pieces, so that the corners of the bottom would fit. I also planed and smoothed the bottom a little more. Sat morning I glued the sides and bottom together.

20140302-214650.jpg

Over the last few weeks I’ve been reading Handplane Essentials by Chris Schwarz. He writes several times about the advantages of a cambered iron for a jointer and smoothing plane. While my glue was drying, I sharpened my irons while adding a slight curve at the corners. It only takes a couple of thousandths on each side. This radius prevents the irons’ corners from digging in and leaving a plane track. Something you don’t want from a smoother for sure. I haven’t used my jointer much since then, but if it’s anything like the smoother, I’m sure it will be dramatic.

Once the sharpening was finished, if carefully positioned the blade so the camber was centered in the middle of the mouth. I then took a panel off cut from my first step stool, adjusted the blade to take a light cut and gingerly began to smooth this panel. Previously with this panel, I had a lot of problems with grain tear out and general unwillingness to plane. Not so now. The difference was dramatic. I’m not sure if you can tell from this picture, but the surface is as smooth as a baby’s bottom.

20140302-220803.jpg 
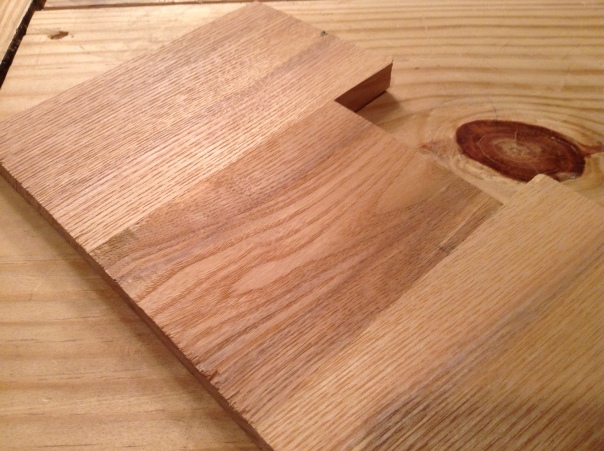
I was able to remove tear out and completely smooth both sides, without plane tracks. I was amazed. I then went to work on Kate’s small box.

20140302-221030.jpg 
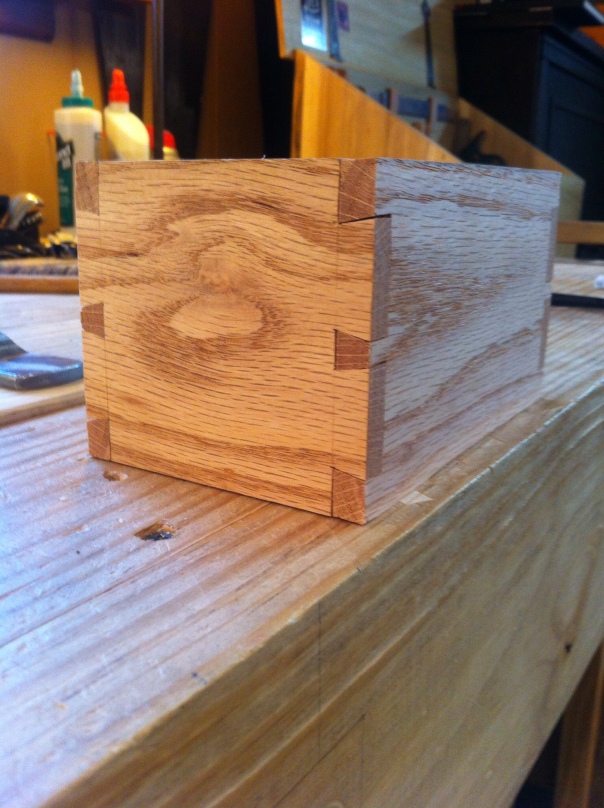
Same result. A near glass smooth surface with no track marks. It should finish up beautifully. I was able to smooth my tails and pins with no trouble at all.

A little over a year ago when I began my hand tool adventure, my Pop gave me a Jack plane of his that he never could get to work. His heart was in the right place, but the plane is a piece of crap. Yet, I learned a ton about planes from it because I had to do so much to it to get it to work. So I felt pretty confident in my plane skills early on. When I bought Handsaw Essentials, I ordered Handplane Essentials based on Megan Fitzpatrick’s recommendation. I thought I might find a couple of good things in it. HA! I’m a goob. I now realize I know squat about hand planes. Buy the book, you’ll be glad you did. I am.

Next up for this project was a lid. And I wanted one you can take on and off easily and looks half way decent. I went with the idea of a rabbet on the inside to locate the lid appropriately and a small raised panel on the top. Sun I made it as far as the rabbet on the inside surface.

20140302-222850.jpg

20140302-223005.jpg 
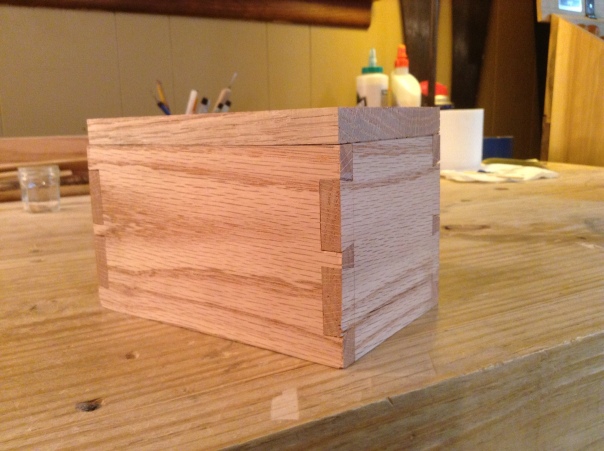
It also sits nicely on the box.

Fri was an especially nice day because I received some new tools from Lie-Nielsen, a large shoulder plane and two floats.

20140302-223248.jpg 
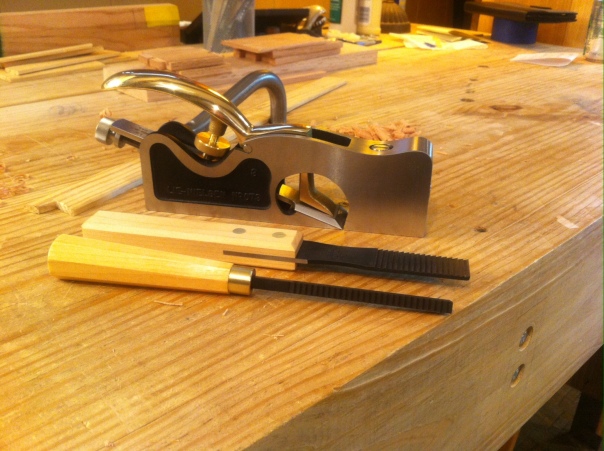
I haven’t had a chance to use the floats, but a little one for the shoulder plane. It’s a finely made tool, just what you would expect from Lie-Nielsen. I honed a small secondary bevel on the blade and tried it out on this lid. It’s easy to adjust and certainly squares up a shoulder and cheek. More later as I get additional time with it. Tomorrow I will raise a panel on the lid and hopefully wrap this project up in a couple of days. Stay warm, dry, and safe.
-Charlie

Small Box for Kate…Part 4…

Wed and Thu night I cut the grooves to capture the box’s bottom. For the two short sides, I was able to saw the groove walls to depth and then chisel and router to the correct depth. On the longer pieces, I couldn’t use the saw.

20140227-220649.jpg

20140227-220731.jpg

20140227-220755.jpg

20140227-220821.jpg

20140227-220840.jpg For the two long pieces, I need to extend the groove about 1/8″ at each end, so that the groove is continuous. I’ll do that tomorrow evening before I glue everything together. Be safe.
-Charlie

Small Box for Kate…Part 3…

Ralph, at Accidental Woodworker, pushed me in the direction of a captured bottom today. I had been leaning that way, but his comment tipped me over. So tonight I set about squaring up a piece of red oak. I chose 1/4″ as the final thickness since that is the smallest groove I can currently make and also to capture all of the bottom rather than just a lip. The groove will be 3/16″ in depth, allowing for 1/8″ of board and a gap of 1/16″ on each side. The bottom will float in the groove and I hope I’ve allowed enough for seasonal changes.

Once I had the bottom squared and correctly sized, I laid out the grooves on each piece measuring referencing from the top of each piece. Which reminds me, I need to visually inspect the groove on each piece to make sure they line up from piece to piece. I don’t want to repeat the mistake I made on the tool chest drawer. Below is a pic of the sides and bottom. If you look closely, you can see the groove lay out lines. Stay warm and be safe.
-Charlie

20140225-224403.jpg

Sketchup and a small box…

Fri night and Sat, I spent 5-6 hours off and on learning about the 3D modeling software Sketchup. I down loaded one of Bob Lang’s shop class videos on Sketchup fundamentals from Popular Woodworking magazine and worked halfway through the lessons. I watched the video for a little while, practiced what I saw, watched the video, and so on. Bob’s lessons are well done and straight forward. It’s like he’s right there beside you drinking a cup of coffee explaining how to use the program. Sketchup is very slick and powerful modeling software. I like what I’ve seen because it enables you to quickly make a 3D model of an idea that you may have and see how it will look. You can also make changes to the model and see the change without starting from square one. It requires a little investment in time, but I think it can be a very useful tool for woodworkers.

Sun afternoon, I started on a small box for my daughter. I used some scrap red oak.

20140223-224103.jpg Cut and dimensioned the four side pieces and then cut the tails and pins. Learned a couple of things along the way. One, I need to start the tails at their proper angle instead of vertical and then leaning over. Doing so left my tails rounded at their ends and with a gap from the pins. Two, don’t get too close to the base line with my coping saw. I tried to get as close as I could. Most of the time I was ok. But once I went to far. I bought a 3 pack of very thin blades from Sears of all places and they work great. You can turn some tight corners with them.

20140223-225911.jpg More tomorrow. Have a great Mon.
-Charlie